Shot Mask
Hey all. If you've been checking out the work from Animation Mentor (and hopefully you have, or else you won't know enough about your competition), you've probably seen the black bar at the bottom of their in-progress assignments, which lists their names, the status of the assignment, and the frame count.
Frame counters are extremely helpful in critiquing someone's animation, but frame counting scripts in maya utilize the HUD, which results in a tiny, tiny number that doesn't read well online after compression and the like.
The shot mask animation mentor uses is not something added in post. It's an object within maya that updates the visibility of several polygonal numbers to keep track of the frame. They position it in front of the camera so that it occupies the lower part of the screen.
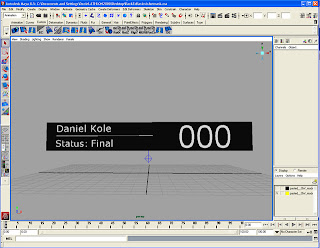
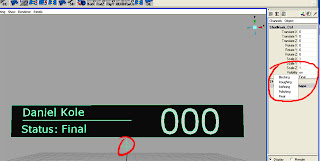
In order to help us critique each other, I've coded a similar shot mask. It has a place for your name, a frame counter, and a "Status:" label. I've added a control that lets you choose the text displayed there from the following list: Blocking, Rough, Refining, Polishing, and Final.
The mask looks like this:

The same control also allows you to move and scale the mask. The background black bar can be scaled independently of the other objects, so you can make sure it fills the area you want it to without skewing the text.
You will need to change the name to yours, of course.
1. Create -> Text -> Option Box
2. Type your name
3. Select front "Verdana.
3. Select Type: Poly
4. Create
5. Delete the history on the selection.
6. Delete the curves that are left over from creation (they border each letter)
7. Delete the extra group that was created (check your outliner)
8. With all the polygons in your text selected, go to your hypershade, right click the material called "matMaskText," and assign material to selection.
9. Now use the group to which all the character belong to scale and position your name accordingly.
10. Delete my name, which is the group "ggMask_Name"
11. Make your group the Child of the curve ShotMask_Ctrl
The control for moving the mask is a curve beneath the center of the mask. It has an attribute called Status that will allow you to select the text you want for the Status line.

All righty then, that's a wrap. I hope this proves useful for you. Here's an example of what it looks like in a shot:
Download the file here:
woodsideanimation.com/shotmask.ma
Later!
Frame counters are extremely helpful in critiquing someone's animation, but frame counting scripts in maya utilize the HUD, which results in a tiny, tiny number that doesn't read well online after compression and the like.
The shot mask animation mentor uses is not something added in post. It's an object within maya that updates the visibility of several polygonal numbers to keep track of the frame. They position it in front of the camera so that it occupies the lower part of the screen.
In order to help us critique each other, I've coded a similar shot mask. It has a place for your name, a frame counter, and a "Status:" label. I've added a control that lets you choose the text displayed there from the following list: Blocking, Rough, Refining, Polishing, and Final.
The mask looks like this:

The same control also allows you to move and scale the mask. The background black bar can be scaled independently of the other objects, so you can make sure it fills the area you want it to without skewing the text.
You will need to change the name to yours, of course.
1. Create -> Text -> Option Box
2. Type your name
3. Select front "Verdana.
3. Select Type: Poly
4. Create
5. Delete the history on the selection.
6. Delete the curves that are left over from creation (they border each letter)
7. Delete the extra group that was created (check your outliner)
8. With all the polygons in your text selected, go to your hypershade, right click the material called "matMaskText," and assign material to selection.
9. Now use the group to which all the character belong to scale and position your name accordingly.
10. Delete my name, which is the group "ggMask_Name"
11. Make your group the Child of the curve ShotMask_Ctrl
The control for moving the mask is a curve beneath the center of the mask. It has an attribute called Status that will allow you to select the text you want for the Status line.

All righty then, that's a wrap. I hope this proves useful for you. Here's an example of what it looks like in a shot:
Download the file here:
woodsideanimation.com/shotmask.ma
Later!

2 Comments:
Is this .ma file still available for download anywhere? The link is broken.
hi, could you please update the .ma file again?
Post a Comment
<< Home